Sunday 27 April 2014

Part III Plants


Here are some hints about which plants I have actually in my terrarium.

Almost evident for a rainforest terrarium I have implemented a bigger philodendron (bought as an ample with long hanging over sprouts).
Basic Planting
The long sprouts can be wound around the big basic bamboo stick crossing.
At the upper bay I planted a nesting fern.

Anthurium / Flamingo Flower
My daughter asked me to use many colored plants. At earlier times, we were very excited about bromelia plants, which have all kinds of beautiful colors and awesome blossoms. Also they seem to serve well for the original tropical flora, and the animals often use them as drinking water sources.
Chamaedorea
The downside of bromelia (especially the very small ones) is, they tend to fade quite quickly and after flowering, the florescences dry out and become uhmm just ugly. The lower leaves still stay green though, and still serve as a water crypt.

OK, I don't want to replace the bromelia plants all the time, to have colored flora in my terrarium.
Tricolor Rhoeo
So, to have colored spots I chose Anthurium  plants, aka Flamingo Flowers. They don't occur in Madagascar orginally (origin is south america & carribean), but the climate conditions fit well for the habitat, and the geckos love the smooth surface of the leaves.
I'm currently a bit unsure about toxicty of these plants, but all I've seen listed  to be exposed pets were cats and dogs, and I've seen no mentioning of being problematic in terrarium envrionments and with any kind of reptiles (I'll try to get more solid information about the harmlessness of Anthurium plants for reptiles!).


Another plant I have chosen is the Chamaedorea (aka parlour palm). This plant is also originated in south america, and fits the climate conditions well.

Another plant I have placed into the foreground is a Tricolor Rhoeo (I guess).

All in all I think it's pretty much colored flora now, and all is appropriate for the habitat and selected for a long term lifespan and growing in the terrarium.

Saturday 26 April 2014

Uff! And finally ...

... I have managed to move my little cuties to their new habitat:


After about half a year of remorse, keeping my pets in a too small habitat, they were released today now!
I guess, I was just lucky about their genders. Either they are two females, or a very harmonic male/female pair.

Be Aware:
Phelsuma geckos. chameleons and other kind of tropical reptiles are well known to behave territorial dominant and aggressive against fellow habitants.
Phelsuma Klemmeri,- as I have -, is known to be one of the less aggressive species, but may be exposed to unapropriate sexual behavior (and stress so), due to early mature males.

Friday 25 April 2014

Just a break ...

... to show some pics of my lovely pets (it's all about them)


Part II Lighting and other supplemental Hardware (continued ...)

2.3 Humidity control

The first step to get a balanced climate in the terrarium was already taken when doing the modiifcatons recommended at paragraph 2.1. Though we need to guarantee a relatively high humidtiy at a day average, but avoid any mildewing of the planting substrate or other base materiial.

2.3.1 The substrates for planting

I have decided to use hydroculture substrate for the planting bases. I chose a mixture of orchidee and common indoor plant substrates (Seramis actually), and filled up the ground and planting bays with it. 
I prefer the stable, controllable ceramic substrate over plain garden mold, or even cocohum cocos fibre substrate.


2

The frequently necessary moisturiing can be done either manually, using an appropriiate mister, or installing an automated irrigation plant.
I have decided to choose the latter option, because it wiill serve more reliable than me ;-).


2.3.2 Installing an automated irrigation plant

I have bought an automated irrgation plant, to eliminate my sometimes lazy behavior with the daily dues about zoo & plants keeping:


It's easy to install, just screw it up through the metal gaze at the top. The orifice are light weight enough to directly mount them.


My first nstallation attempt was a bit flawed:

  • I forgot to apply the rubber knobs at the bottom side of the pump case. It vibrated heavily, and even wandered over it's place.
  • The connecting hose to the 1st orifice must be kept as short as possible, to avoid dripping water from the frst orifice.
    If this doesn't help, or if you can't make the hose shorter for some reason, the installation of a back pressure valve may solve the problem. (After I had just shortened the connecting hose, the problem was solved at least for me).
If you obey the points about installaton, mentioned above, the M.R.S Micro rain is a high quality irrigation plant that nebulizes the water very fine and in a fairly controllable way. I use osmotic water for driivng it, and you should also obey, that the water tank is placed at a lower level than the orifice, to avoid pressure anomalies and water drippng from connectors.

2.4 Timing and programming the lightning and irrigation

For timer programming of the power sources I have chosen an  EnerGenie EG-PMS2 USB programmable power dstribution plug. There's also a (maybe) more convenient WLAN controllable version.
But considering the price, and what you actually need (program the system timings once), it may not worth it for this purpose.

I can setup the necessary timings for each of the power sockets quite conveniently, using a USB connection, and the bundled software.

One important thing to notice, about running a basking sun heat spot:
The installation of my heat spot socket (installed inside) is in the 'fireline' of one of the irrigation orifice. Thus you'll need to separate times of running the features.
My first (stupid, even not aware) attempt, to have a (fully heated) spot lamp, and running the irrigation plant , resulted in thousands of fine broken glass pieces of the lamp (that ended it life with a loud "Pouff", when it was hit by the even smallest drop of cold water).

So: Break off times of running the sun heat spot, and the irrigation plant widely, thus the irrigation won't ever hit a heated lamp!

Part II Lighting and other supplemental Hardware

2 Lighting and other supplemental Hardware

Choosing the right light sources and techniques to control your environmental conditions is pretty essential to ensure the health of your flora and fauna hosted in your terrarium.

2.1 Necessary modifcations for a standard glass terrarium

For the optimal air condtionings needed for a phelsuma suited rainforest terrarium the standard 100mm wide perforated plate at the middle strip isn't suitable, to enable the necessary air exchange.

Also,- and may be even more important -, your reptiles need a suitable UV light spectrum to stay healthy. The glass platters at the top filters the UV spectres needed by the animals from the lightning installation, if placed outside the corpus (which is recommendable IMHO).

So you need to remove either the whole top or part from the corpus, and replace it with fine aluminium metal gaze.


Removing the silicon glued glass plates reads easier, as it actually comes out to be.
I had at least success using a solid carpet cutter. Start peeling out the silicone from the seams, try to get inside the seam with the blade while whle lifting the glass plate simultaneously.


2.2 The lightning installation

As mentioned before, the correct UV spectrum of your main light sources is essential for your animals, and flora as well.
Fortunately my sister left over a high quality HQI sunlight lamp to me. This model was desgined to be mounted hanging over an aquarium and is fully integrated in a case. It's just necessary to plug it to the power socket.

I have a second lamp, I had already ordered before I got the HQI, and decided to install both. This one is a Exoterra Solar Raptor lamp, which promises a pretty natural sun light spectrum, suitable for phelsuma geckos and other tropical animals.


At the left side the HQI lamp, at the right the SolarRaptor lamp
in a heatng cone bulb socket

To run the Solar Raptor, you need an electronic ballast. You cannot simply screw it into a bulb socket (though it fits), and plug it to your house power supply. Just look out for kits including the ballast, when you by the lamp. A small screw driver, and a dauntless cable cut at the bulb socket installed cable, should serve the rest well.

The electronc ballast placed before the SolarRaptor bulb socket

If I wouldn't have been that lucky about the HQI lamp, I had considered installing a second SolarRaptor maybe.

Though I have a 3rd lamp just purposed for heating a warming spot at certain hours. This one is nstalled insde the corpus (not yet, I have to update and illustrate this later).

To be continued wtith:

2.3 Humidty control


Wednesday 23 April 2014

Part I: Backgound Design


1 Background Design

I have decided to make a backgroud based on styrodur plates and some natural materials.
Finally everything is coated with epoxide rasin to avoid any accidents regarding mold or anything alike. This terrarium should simulate rainforest conditions, and thus should work out long time with high air humidity.

1.1 Build a base

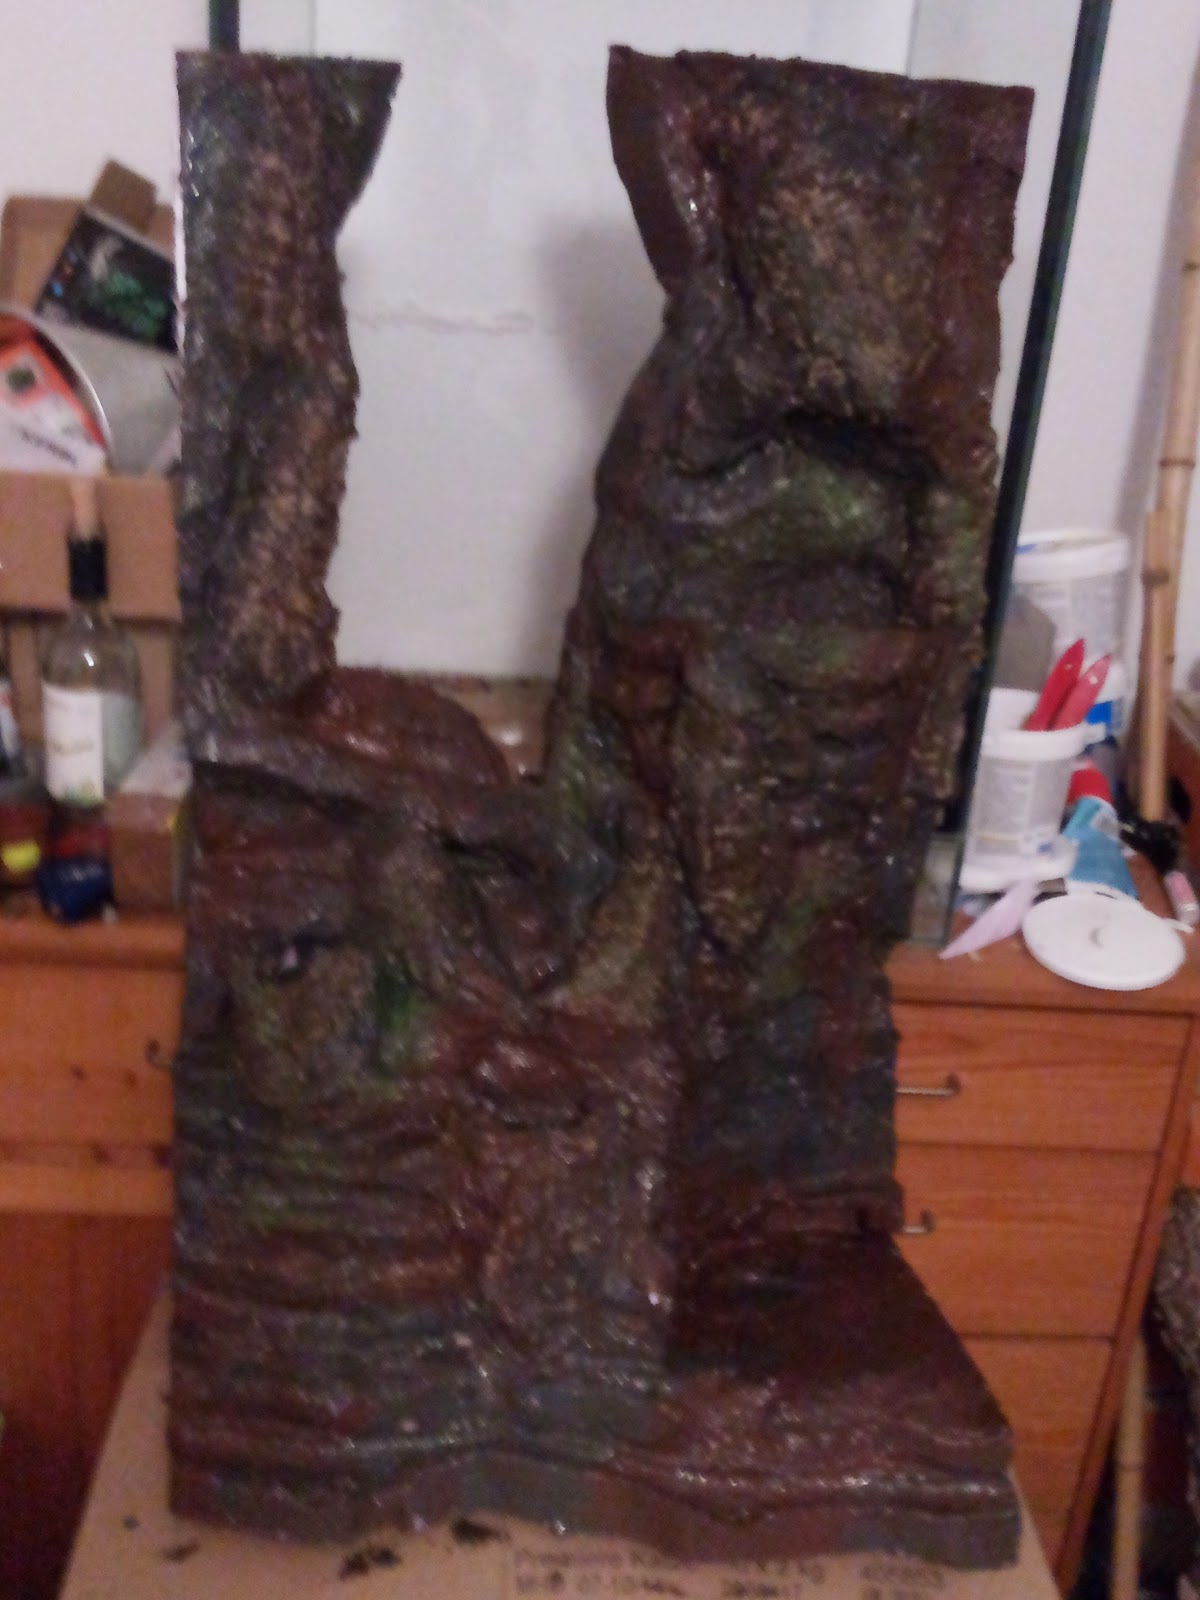
I have build up a 1st rough form of my background wall, made from styrodur plates (40-50mm thick). All of the forms were cut out and assembled using styropor glue.

Regarding the waterfall kit, I have left some space at the right side, and made a cavity to receive the cable length necessary to handle the upper part of the waterfall  (You'll need to remove and replace the lower water reservoir part frequently). The main part of the waterfall cable is lead at the right backside of the background, cut a way as necessary.

Note: 
The sizes of the whole construct should be dimensioned that you can still put it in/out from the glass corpus!

1.2 Model the Base


The first step is to model the assembled styrodur plates using a hot air fan. You should experiment with the materials reaction to your particular fan's settings (mine has a temperature varying from 100-800°C) with a dropped out piece.
Note: 
You should not use the hot air fan inside the glass corpus! There's danger to hit the glass with the hot air beam  and break it!
Second step after melting the styrodur ground, is to smooth it and apply pieces of natural cork bark. I have used tile adhesive to do this. Partially with a brush and thinned with water.

Some of the cork bark pieces I had cut out as a (hollow) half cone from a whole branch cylinder, that they can be used as planting bays later.

1.3 Color and Seal


To color the base model I have used water based dispersion and acrylic color, mainly dark brown, sap green and dark grey.


Note the nice effects of brushing over the dried surface with light ocre highlights.

After the first coloring the background was all over sealed with epoxide resin. 
To avoid the glossy effect of the epoxy and make a better growing ground for moss, I have flock coated the wet resin with coconut fiber substrate.


1.4 More Decoration


I decided to have a bit more (artificial) decoration applied to my background and bought an ExoTerra Jungle Vine to build a realistic looking simulation of a liana root or s.th. similar.
If I had the knowledge of the material, I had after cutting it to pieces I may have decided the price isn't worth it :-(. OK, it's all mainly amenable wire coated with a paper corpus and a color + whatever mix surface (which easily breaks on bending).

I have used the stuff mentioned above though of course. I have cut off the 'Jungle Vine' into 3 main pieces and added drilled roles of newspaper, coated with (thick) color. The connection points of  'vine sprouts' were adapted using some of the styropor glue leavings.

The additional vine decorations were sealed with epoxide resin, and flocked with coconut fiber substrate and other material again (to substitute the "other material", you might consider coloring the coconut fiber substrate yourself).


That's what it looked all about in "full light" after the above steps.
When I placed the whole ensemble into the glass corpus I also stuffed the (necessary for maneuvering) gaps at the sides left and right. 
Finally these gaps and all of the gaps to the glass corpus were sealed with silicone.

Read about lightning, humidity control, planting soon ...